

Starting out in the gym or beginning a new functional strength routine can feel a bit like walking into a crowded room where everyone knows the language except you. We’ve all been there—standing in front of a rack of dumbbells or a set of resistance bands, wondering if that slight “twinge” in our lower back is a sign of progress or a warning of an impending injury. As a lab technician who has spent years analyzing the physical markers of stress and recovery, I can tell you that the most “hardcore” thing you can do for your body isn’t lifting the heaviest weight; it’s mastering the “boring” mechanics of proper form.
When we talk about exercise form, we aren’t just talking about looking good for the mirror. We are talking about joint longevity. If you’ve ever felt “beaten up” after a workout rather than “built up,” your form is likely the culprit. This guide is your blueprint for safety. We’re going to strip away the complex jargon and give you the 7 simple rules that will help you “bulletproof” your body, protect your vagus nerve, and ensure that you can keep training for decades to come.
Key Points: The Foundation of Safe Training
- Joint Alignment: Keeping your joints in a “stacked” position may help reduce unnecessary shearing forces on your ligaments.
- The “Brace” Signal: Learning to engage your core isn’t just for aesthetics; it provides a structural “shield” for your spine.
- Range of Motion: Training through a full, controlled range is often more effective for muscle fiber recruitment than using heavy, “ego-driven” partial reps.
- Mind-Muscle Connection: Focusing on the muscle you are working may help improve neuro-fitness and prevent secondary muscles from taking over.
THE PROBLEM: The “Ego-Lifting” Trap and Systemic Inflammation
The primary issue for beginners in 2026 isn’t a lack of effort; it’s a lack of mechanical awareness. When you use poor form—like rounding your back during a row or letting your knees cave in during a squat—you aren’t just risking a “pop” or a “snap.” You are creating micro-trauma in areas that aren’t designed to handle it. This triggers a massive spike in systemic inflammation, which can actually stall your fat loss and muscle growth.
If your body is constantly trying to “heal” damaged joints and inflamed tendons, it won’t have the resources to build new lean tissue. This leads to that “perpetually sore” feeling that many beginners mistake for a good workout. Furthermore, chronic poor form can lead to cortisol spikes, which may encourage the storage of visceral fat. Training safely isn’t about being “soft”; it’s about being efficient so your body can focus on repair rather than just “survival.”
WHAT: Defining Proper Form as “Structural Integrity”
In a clinical sense, proper form is the ability to maintain “Structural Integrity” under load. This means that as you move a weight—whether it’s a kettlebell for loaded carries or your own body weight—your skeleton remains in a position of maximum strength.
Proper form ensures that the tension is placed on the muscles (which can grow and adapt) rather than the joints (which have limited blood flow and slow repair rates). By following these rules, you are essentially “tuning” your internal engine, allowing your protein pacing and fibermaxxing efforts to actually manifest in a stronger, leaner physique.
WHY: The Link Between Mechanics and Longevity
Why does form matter so much for longevity? Because your joints are like the “tires” on a car. If the alignment is off, you might still be able to drive fast, but those tires are going to wear out 10 times faster. Research suggests that keeping the spine neutral and the joints stabilized may help reduce the long-term risk of degenerative issues.
Moreover, good form is a “neural skill.” When you move correctly, you are training your brain to recruit muscle fibers more effectively. This is the heart of neuro-fitness. Over time, this efficiency allows you to lift more weight with less effort, reducing the “perceived stress” on your system and keeping your vagus nerve in a state of calm resilience.
THE SOLUTION: The 7 Simple Rules for Beginner Safety
Rule 1: The “Neutral Spine” Absolute
Your spine is the “conduit” for your nervous system. If you kink it under load, you’re looking for trouble.
- The Action: Whether you are bending over or standing tall, imagine a straight line running from your tailbone to the back of your head.
- The Goal: This may help protect the discs in your back and ensure that your vagal tone stays high by preventing “panic” signals from traveling to the brain.
Rule 2: Master the “360-Degree” Brace
Most people think “bracing” means sucking in their stomach. It’s actually the opposite.
- The Action: Imagine someone is about to punch you in the gut. Breathe into your belly and “push out” in all directions.
- The Goal: This creates internal pressure that supports your spine from the inside out. It’s the ultimate “safety belt” for heavy rucking.
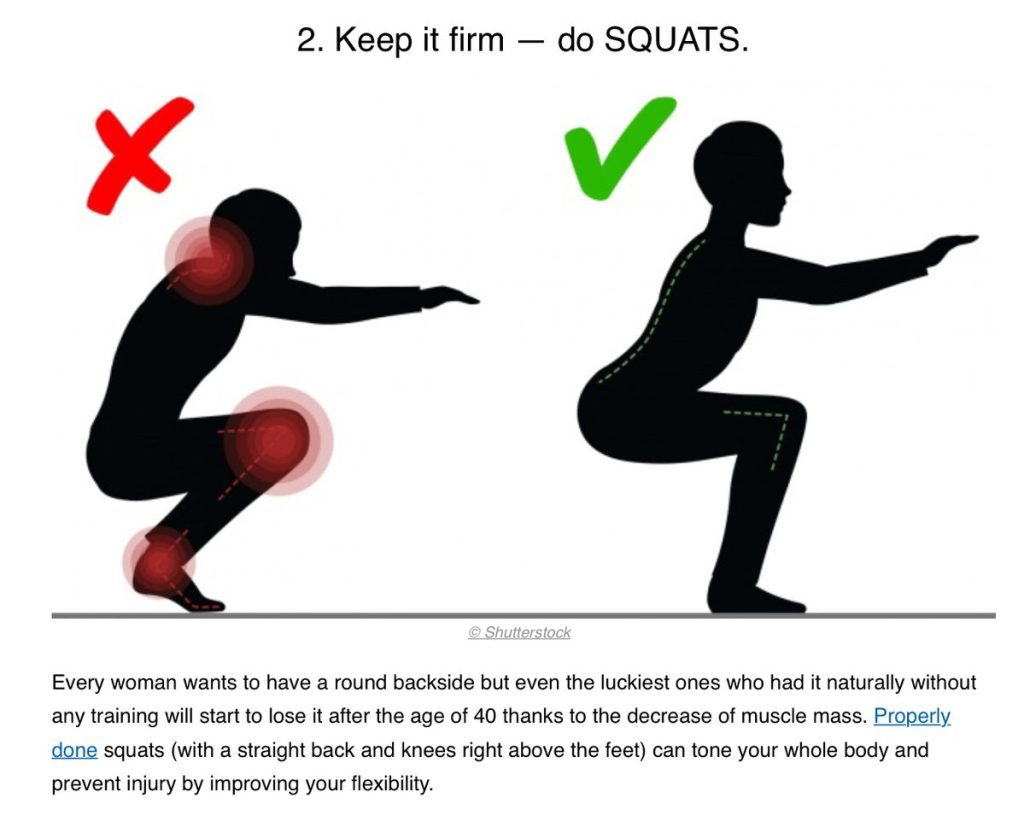
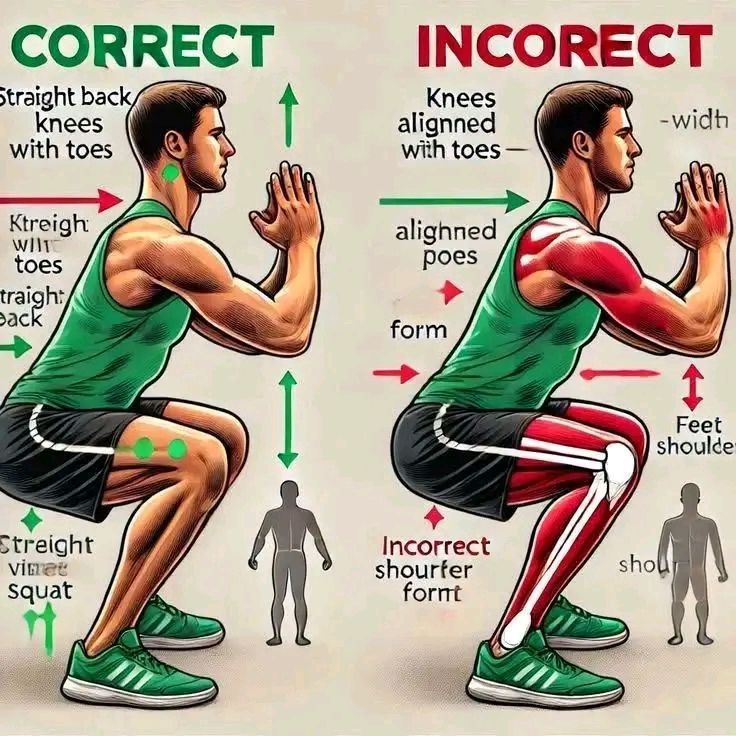
Rule 3: Knees Must Track the Toes
If your knees “cave in” (valgus collapse), you are placing immense stress on your ACL and meniscus.
- The Action: During squats or lunges, ensure your kneecap is pointing in the same direction as your second and third toes.
- The Goal: This keeps the “hinge” of the knee joint moving in its intended plane, reducing the inflammation that causes “clicky” knees.
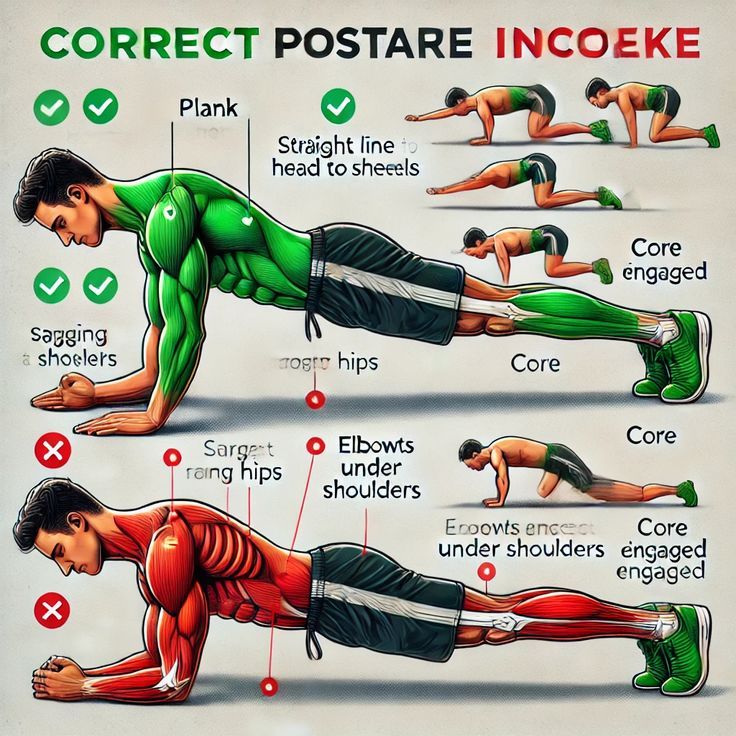
Rule 4: Pack the Shoulders
The shoulder is the most mobile—and most unstable—joint in the body.
- The Action: Before any “pulling” or “pushing” movement, pull your shoulder blades “down and back” (as if putting them in your back pockets).
- The Goal: This creates a stable “shelf” for the joint to move from, preventing the impingement that often halts resistance band progress.
Rule 5: Use “Time-Under-Tension” Control
Gravity is not your friend if you let it win. Dropping the weight too fast is a leading cause of tendon issues.
- The Action: Take 3 seconds to lower the weight on every rep.
- The Goal: This increases metabolic stress on the muscle while decreasing “shock” on the joints. It’s a safer way to build fat-burning muscle.
Rule 6: The “No-Pain” Threshold
There is a big difference between “muscle burn” and “joint pain.”
- The Action: If a movement causes a sharp, stabbing, or “electric” feeling, stop immediately.
- The Goal: Pain is a “bio-feedback” signal. Respecting this signal helps prevent the kind of injuries that require lengthy recovery protocols.
Rule 7: Finish with Nasal Breathing
How you end your workout dictates how you recover.
- The Action: Once you finish your last rep, close your mouth and breathe only through your nose for 2 minutes.
- The Goal: This signals the brain that the “battle” is over, activating the vagus nerve to begin the quenching of inflammation.
RESULT EXPECTED: The Beginner Progression Timeline
- Immediate (1-3 Sessions): You may feel “shaky” as your brain learns to coordinate these new movements. This is a sign of neuro-fitness adaptation. You’ll likely notice you aren’t as “beat up” the next day.
- Short-Term (2-4 Weeks): Your confidence will skyrocket. You’ll find you can lift more weight simply because your “leverage” has improved. Your joint stiffness should begin to decrease.
- Long-Term (3 Months+): This is where you see the “aesthetic” payoff. Because you haven’t been sidelined by injury, your consistency allows your protein pacing to finally build noticeable muscle and your fat loss to become permanent.
CASE STUDY 1: Reversing the “Lower Back Twinge”
Subject: 52-year-old male, starting functional strength after years of inactivity.
The Problem: Every time he tried to do a “hip hinge” or pick up a kettlebell, his lower back would hurt for three days. He was terrified of “throwing his back out” and was about to quit. In my observations, he was “rounding” his spine because he didn’t know how to brace his core.
The Intervention: We implemented “Rule 1” (Neutral Spine) and “Rule 2” (360-degree Brace). Before he picked up any weight, he practiced the brace while performing vagal breathing.
The Result: Within one week, he was performing loaded carries with zero back pain. Research suggests that by stabilizing the “core cylinder,” we can protect the lumbar spine from over 70% of shearing forces. He reported feeling “stronger in his soul” because he no longer feared his own body.
CASE STUDY 2: Saving the “Clicky” Shoulders
Subject: 34-year-old female, using resistance bands for at-home fat loss.
The Problem: She had constant “pinching” in her right shoulder whenever she did a chest press or row. She was taking anti-inflammatories daily, which we know can hinder long-term repair.
The Intervention: We introduced “Rule 4” (Pack the Shoulders) and “Rule 5” (TUT Control). We also added a magnesium protocol to help her tight trapezius muscles relax.
The Result: Her shoulder “pinch” disappeared in 10 days. Observations show that by packing the joint, she opened up the subacromial space, allowing the tendons to glide without friction. She was able to increase her workout intensity, which finally triggered the metabolic thermogenesis she needed to break her fat-loss plateau.
COMMON MISTAKES: Why Beginners Get Hurt
- Rushing the Eccentric: Dropping the weight fast is the #1 way to tear a tendon. Control is king.
- Looking in the Mirror (The Wrong Way): Cranking your neck to the side to “check your form” while under load can cause a neck strain. Use a camera or have a partner check.
- Breath Holding (Valsalva): While advanced lifters do this, beginners often hold their breath until they turn purple, which can cause a spike in blood pressure. Practice “exhaling on exertion.”
- Training Through “Bad” Pain: If it feels like a needle, stop. Don’t be a hero; be a technician.
TROUBLESHOOTING: When Form Still Feels “Off”
- “I can’t squat without my heels coming up”: This usually means tight ankles. Use a mobility flow or put small plates under your heels temporarily.
- “My grip gives out before my muscles”: This is a common bottleneck. Work on your grip strength but don’t let it stop you from training—use straps if you must, but keep the TUT slow.
- “I feel the move in my neck, not my back”: You are likely “shrugging” the weight. Re-focus on “Rule 4” and “Rule 1.”
- “I’m too tired to keep good form”: This is your cue to end the set. Quality reps build muscle; “trash” reps build injuries.
COMPARISON: “Ego Lifting” vs. “Form-First” Training
| Feature | Ego Lifting (Heavy & Fast) | Form-First (Controlled & Safe) |
| Joint Stress | Extremely High | Minimal / Productive |
| Muscle Growth | Inconsistent (Poor recruitment) | High (High TUT) |
| Injury Risk | High | Very Low |
| Inflammation | Chronic / Systemic | Acute / Productive |
| Longevity | Short-lived | Decades of Pillar Strength |
FAQ: Frequently Asked Questions
Q: Should I use a belt as a beginner?
A: Usually, no. You want to learn to build your “natural belt” first through proper bracing. Use a belt only once you are moving very heavy loads relative to your body weight.
Q: Is “perfect” form really possible?
A: “Perfect” is a myth, but “Safe” is a requirement. Your form will evolve as your mobility improves.
Q: How do I know if I’m “bracing” correctly?
A: If you can maintain the tension in your stomach while still taking small, “sipping” breaths through your nose, you’ve mastered it.
Q: Will “Form-First” training help me lose visceral fat?
A: Yes. Better form allows for higher intensity and better metabolic signaling without the cortisol spikes of an injury.
Q: What if I’m too inflexible to do the move correctly?
A: Modify the move! A “partial” squat with good form is 100x better than a “deep” squat with a rounded back.
FINAL TAKEAWAY: The Discipline of the Technician
In 2026, we’ve learned that the fastest way to get where you want to go is to never have to stop. Proper Exercise Form is the insurance policy that allows you to keep training, keep protein pacing, and keep evolving. By treating yourself like a technician and respecting the mechanics of your body, you aren’t just “working out”—you are building a fortress of health that will last a lifetime.
Disclaimer: This information is for educational purposes only and is not intended as medical advice. Individual results may vary. Consult a professional before beginning any new physical exercise program, especially if you have pre-existing joint or spinal conditions. Use of these techniques is at your own risk.
Next Step: Find Your Metabolic Bottleneck
Are you a Stalled Optimizer or a Metabolic Warrior? Stop guessing and start signaling.
To find out which of your 4 biological pillars is stalling your progress, take our 2-minute diagnostic:
Take the 2026 Bio-Recovery AuditDiscover your score across the 4 Pillars of Performance: Engine, Armor, Cleanup, and Repair.